Showing posts with label crafts. Show all posts

30 September 2008

My Crafty Afternoon

I actually meant to do this project a couple of weeks ago, but I'm just now getting around to it. During the summer, we have this anchor thing that hangs on the wall by the door and it has pegs across the bottom and we use it to hang our keys on. Well, since summer is over, I wanted to take it down and replace it with something else. Only I couldn't really find anything I liked that would fit in such a small space. So, I made something! It's cute, it was cheap to make and I can do a new one for Christmas too!

Here are 3 wooden letters I bought at Jo-Ann's a few weeks ago. These are our initials, the "W" and one "L" are smaller than our last name initial.

Pic088

I picked out a couple of pieces of scrapbook paper I liked that had an Autumn feeling to them and then chose the paint color. I only painted the edges of the letters because that is all that shows and I am lazy. See my post from earlier today. L-A-Z-Y. I picked a nice pumpkin color to paint the edges.

Pic090

Pic091

Pic093

After the paint had dried, I turned the scrapbook paper right side down, turned the letters over so the right side was down, and I traced around them. The "W" was a pain to try and trace out!! As you can see from the paper, I guess some of the paint wasn't dry after all! Oh well.

Pic094

After cutting out the letters, I used Mod-Podge to glue the paper onto the wood. I used a very thin coat for the smaller two letters since those were primed white when I bought them but the unfinished large "L" soaked up quite a bit of the glue so I had to use more on that one.

Pic095

After the glue had set up a bit and the paper was firmly attached, I used an Xacto knife blade to trim any little pieces of paper that wasn't aligned perfectly. Then I used a small emery board to sand down any snags along the edges. I then flipped the letters over and attached small sawtooth picture hangers on the back. I forgot to take a picture of that step!

Next I added some bronze cup hooks onto the front of the large "L". I should've measured first and pre-drilled the holes but I was lazy. lol I just eyeballed it and hoped for the best.

Pic096

Ta-Da...the finished product. I may have the husband rehang these later. I couldn't really reach the wall to hang these where I wanted them but I think they look okay for now. And we can hang our keys up again and stop throwing them onto my very old Louis Vuitton trunk!

Pic099

Pic100

23 July 2008

My crafty afternoon!!

Well, instead of doing any of the number of important things on my list, I sat right here in my office and made these:

Pic330

Cute little luggage tags for my new bags! Now, I realize the pinks don't match the bags but that's okay with me. I wouldn't want it to match too closely because then it would be too hard to see them. It didn't take too long to make these once I picked out the paper. The colors look a lot better in person too but I couldn't get a very good picture of them.

I used Chipboard Mat Stacks as the main piece since it's good and sturdy.

Pic302

I cut one piece in half to make two tags. They are 3.25" x 4.5" which is a good size I think.

Pic310

For the third tag I used another piece of Chipboard from the Basic Grey [un]Dressed line. It's smaller than the tags above but I think it'll fit better on the smallest of the 3 pieces of luggage.

Pic305

Next, I chose some papers I thought would match well with the chipboard mat stacks. I looked through all of my 12 x 12 paper and couldn't find anything I really loved so then I moved on to my 6 x 6 paper. I found some in one of these little stacks:

Pic306

Not that exact stack, but another one which I forgot to take a picture of! Here are the papers I chose:

Pic307

I cut those papers to the sizes I needed and then used my ATG gun to attach the patterned paper to the chipboard. Here's my ATG gun. Don't look too closely or you'll see dust. It's so dusty because I have been in a crafting slump for oh, about 6 months now!!

Pic316

Pic317

I didn't have to use the ATG to attach the paper to the smallest tag because those pieces of chipboard have adhesive on one side already, which worked fabulously because it would've been a complete pain in the you-know-where to try to use the ATG to run tape all around those weird little shapes! I had to paint the back of the smallest tag because it was just plain chipboard. I used a pretty coral color that matches some of the flowers in the paper on the front.

Pic324

Next, I flipped through all of my little clear stamps I've purchased over the last year and picked out a couple that would work well for the back of the luggage tags. I stamped the back with white ink and then used a black Zig pen to write in my info.

Pic318

Pic326

While the ink was drying on the back, I found a piece of paper that would match the front of the tags and then used my Cricut to cut out letter L's in different sizes and some brackets too. Yes, I'm using my Cricut on the floor. Why? Because my table is so full of crap I didn't have room to put it up there! I'm gonna work on this organizing thing again soon so I'll have room for it on the table!!

Pic321

Pic322

I then used ModPodge to attach the L's and brackets onto the front of the tags. After the letters were attached I used a spray sealer and sprayed the front and back of each tag. I was going to use modpodge again but for some reason that stuff always leaves things feeling tacky so I decided to use the spray. After that dried, I punched holes in the tags & attached some ribbon, leaving enough ribbon on the ends to tie onto my bags.

Ta-da! Simple, easy luggage tags that didn't cost one cent! Well, I guess technically they cost at least one cent since I did purchase all of this scrapbooking stuff at one point in time. But, I now own some unique tags and I didn't have to run to Target and buy something that everyone else has too!! Yay for having a crafty moment today!!

11 June 2008

Work in Progress (or, Wow! This place is a mess!!)


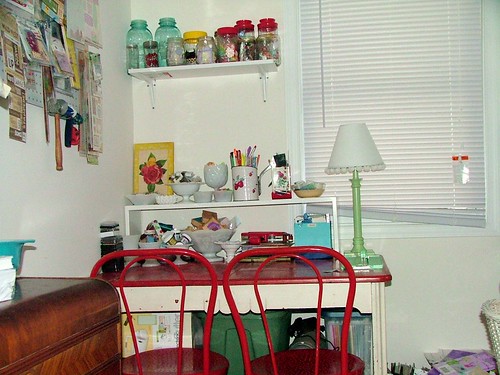
This picture is of my work table area in my scraproom. This is the first time in the 6 weeks we've lived in this house that the desk has been clean enough to take a picture. I have spent days, literally, working in this room trying to get it organized but it still isn't finished.


I am still trying to find a suitable cabinet or bookshelf to replace a few other pieces of furniture in this room that are just not working. I even thought about having the Husband build one but when we priced out lumber we realized it would probably be more expensive to build it than if I found a used one somewhere. Hopefully I find something soon because the clutter and mess is driving me crazy!! If the rest of the room ever gets organized, I'll share more pictures, but I refuse to photograph this room with it looking as it does now! Such a mess.

This little craft room was one of the deciding features of buying this house. Well, that and we were running out of time before our lease was up and all of the other houses we'd put offers on had fallen through but I digress. Anyhow, when the husband and I decided to buy a house, I knew the one thing I really really wanted was a craft room. At our house in SC I never had a room just for all of my scrapbooking/craft stuff. I had to share our room over the garage with a pool table and then I moved all of my stuff into one of the guest rooms but I never did have a place that was *just* for me.

And the house we were renting here in Maryland had a little sunroom on the back of the house that I used as just a craft room but it wasn't very functional. It was also the only way to get outside so the dogs were always coming through and leaving muddy footprints and hair all over the place. Not to mention it was not heated nor did it have air conditioning- which was a nightmare last summer. It was so hot in that room that my paper was curling up!

So, all of the houses we looked at had to have a place for me to use as a craft room. And I really wanted a place with a basement too, which we have, but we're dealing with a little infestation of camel crickets so I do not go down there. At. All. Not until the husband deals with all of the camel crickets.

Anyway, we found this house, probably the 100th one we looked at and either the 3rd or 4th one we put an offer on, and it had this perfect little room off of the dining room that I just knew would be my craft space. It's really too small to be anything else except maybe an office, measuring maybe 7' x 10'. That sounds like a decent sized room but it's still a little on the small side. Either that or I have entirely too much junk in here. I'm going with the first theory though!

I am just so happy to finally have a place -as small as it is- to spread out and do my scrapping and not have to worry about cleaning it all up every day or having to deal with the dogs coming through several times a day getting the place all dirty! Now if I can just get the rest of the stuff organized and put away and actually start working on my list of projects. At least it's better than it was a month ago and with any luck I'll find the perfect storage piece within the next couple of weeks and then my room will look complete!